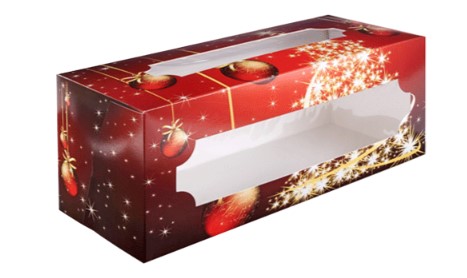
A brand-new project using this product will be in my newsletter, which comes out tomorrow. Sign up to get information, news, and other useful tips.Christmas Gable Boxes This is a quick Christmas treat box you can make. We made this one in my Christmas in July class a while back. Yes, I knew that a long time ago and am just now telling you about it. I’m sorry. I believe you would enjoy seeing it. The Silver christmas gable boxes from the Annual Catalogue are used for these. There are 12 in a pack. They come in white too.The Delicate Lace Edgelits were used to cut the red card. The front and back of the box had this stuck on them. The phrase is from the Stylish Christmas set, and the Everyday Label Punch was used to cut it out. I also punched one from Shaded Spruce to put behind it. On the handle, I wrapped some Real Red Solid ribbon around it. It’s too simple, and they can fit a few sweets.
I Hope You Like It. Thanks For Taking A Look.
Hi Jenny Posted in 3D boxes,christmas gable boxes Delicate Lace Edgelits, Everyday Label Punch, Silver christmas gable boxes Stampin’ Up! Christmas, Christmas StylePost a review about CARDS, CHRISTMAS, TECHNIQUES, OR GUIDES ECLIPSE CARD FOR christmas gable boxes I’ve been experimenting with the Eclipse method lately. One of them is in a post from a few days ago that I made for a prompt. The christmas gable boxes Pines stamp set was used to make this Christmas card.Cherry Cobbler is the base card, and Crumb Cake is the card mat. Garden Green is used to stamp the wood leaves. The Pretty Pines Thinlits are used to cut the gold foil bow.
Have You Yet Tried The Eclipse Method? So Simple, But So Useful.
Come up with the Eclipse Method.With the Eclipse Technique, you cut the words or forms right off of a piece of stamped card and lift them off of the card.1. Stamp the pictures you want on your card. If you’d rather not, you can use a piece of Designer Series paper instead.2. I cut the word out of the white card with the Large Letters Framelits for this card. But you can use any dies to cut out different forms from the white card or paper mat that has been stamped.3. Stick the patterned paper or stamped white card mat straight to the Crumb Cake card mat. Then, stick both of them to the Cherry Cobbler card base.
Use Dimensionals To Lift Each Letter Off The Card Where It Belongs.
Note: I saw in some lessons that the letters were cut out of white card more than once. First, the cut letter was stacked and stuck together. Next, the marked letter was stuck on top of the stack. I don’t think we need to do that. It’s fine to use Dimensionals to raise the letter.I used the Merry Little Christmas DSP again, but this time on the black side of both of these cards.
For this first card, the mailbox image was stamped on Shimmery White paper and then colored with Inkpads and Aquapainters. After that, Silver Foil sheet and Real Red paper were added on top of it. I printed the picture on Thick Whisper White and colored it again with Inkpads and Aq Painter for the next card. The sentiment was printed, then cut out with the Stitched Circle Framelits. It was then put on top of a Real Red scalloped circle cut out with the Layering Circle Framelits. Before I stuck the paper to the base card, I wrapped some thin Real Red Solid Ribbon around it.
It Was Time For Me To Try Something New. Take A Good Look.
The picture was Christmas Boxes on Thick Whisper White. I colored only the gifts, the bow, and the girl’s collar, then cut them out. For a 3D look, Dimensionals were used to lift them off the card. The Clear Wink of Stella pen was used to add color to the white gifts.These are all three cards in one place.